Applies to: All tiers · Last reviewed: 2026-10-24
What this is
A receipt records an inbound shipment from a client and adds its units to on-hand inventory. A receipt holds many lines (product, location, quantity). You create it as a draft, then confirm it to apply the stock. Receipts live at Inventory > Receipts.
There are three ways to receive: Quick Receive (one product into one location), New Receipt (a multi-line document), and Receive on Mobile (scanning on the warehouse floor).
Build a multi-line receipt
- Go to Inventory > Receipts > New Receipt.
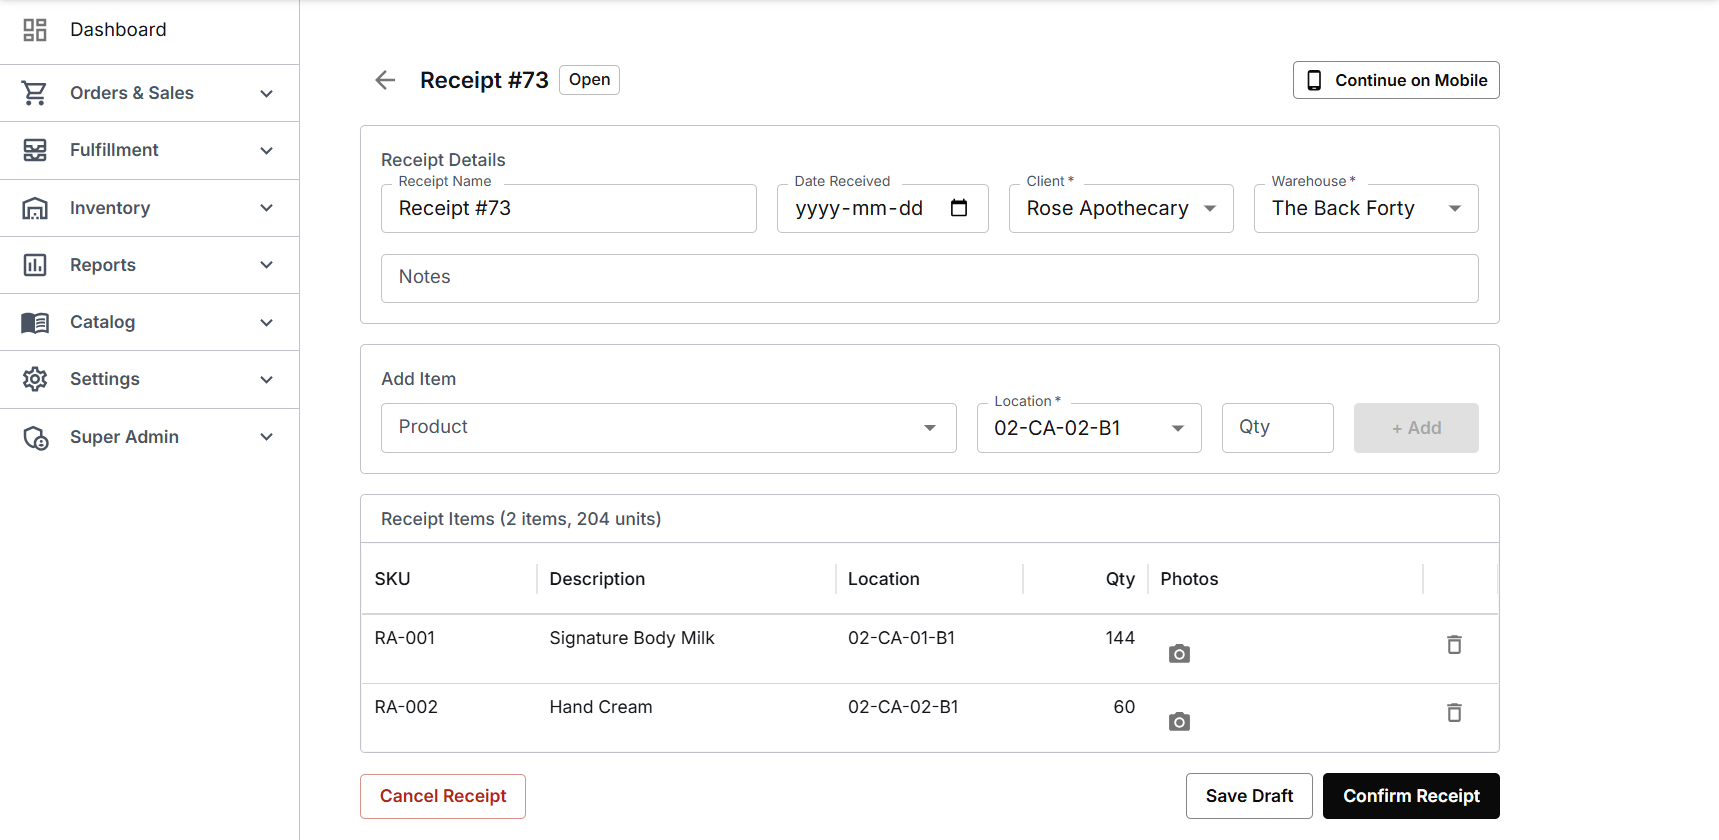
- Receipt details: set the Client (required) and Warehouse (required). Receipt Name auto-generates if you leave it blank, Date Received defaults to today, and Notes is a good place for a truck number or PO. Pick the Client and Warehouse first: the Location field stays disabled until a warehouse is chosen, and the product search is scoped to the client.
- Add each line: search the Product (type the SKU or scan the barcode, then pick from the list), choose the Location bin, set the Qty, and click + Add. The line drops into the Receipt Items list and the running total updates. The location carries over between lines, so a whole receipt going to one bin only needs it set once. If the product already has stock in this warehouse, CanShip pre-selects that bin and tells you it has.
- Confirm Receipt > Confirm & Commit. CanShip applies the quantities to on-hand and confirms "Inventory has been applied." Each line is recorded in Reports > Audit Trail with the source Receipt, who confirmed it and the receipt's name.
Lot numbers and expiry dates
When a product is marked Lot tracked on its Edit Product form, each receipt line for it asks for a Lot # and an Expiry date, and both are required. Use the setting for lot controlled goods, for example food, supplements, cosmetics or medical supplies. A product without the setting has no lot or expiry fields on its line.
Enter the lot number before choosing a bin. If a bin already holds that lot, CanShip pre-selects it and says so. You can split one SKU across several lots on the same receipt by adding a line per lot, and send each lot to its own bin.
Once an expiry date is recorded, picking works earliest expiry first, so the stock closest to its date leaves first.
Reports > Expiry lists every lot in stock, soonest expiry first, with counts for Expired, Expiring and OK, and filters for client, warehouse and how far ahead to look.
Reports > Lot Recall traces a single lot. Enter the lot number and it returns what is still on hand and in which bins, what is allocated to open orders, and every recipient the lot has already shipped to with carrier and tracking. The shipped list exports to CSV.
Photos on a receipt line
You can attach a photo to any line of a receipt, for example of a damaged carton or a packing list. The receipt has to be saved first: on a new receipt the Photos column reads Save to attach photos until you click Save Draft.
- On the saved receipt, find the line under Receipt Items and click Add photo in its Photos column.
- Choose the picture. It is attached to that line at once, with no need to save the receipt again, and shows as a small picture on the line.
- Click the small picture to see it full size.
Photos are added while the receipt is open. Once a receipt is confirmed, Add photo is greyed. It is greyed on a cancelled receipt too, and a photo already on a line of a cancelled receipt can still be opened full size.
Print receiving labels
Once a receipt is confirmed, a Print receiving labels button appears on it. It opens the labels in their own window for printing: one 6 x 4 inch label for each line received. Each label carries the SKU with a QR code, the quantity, the client, and a line reading "Received to" with the bin, the date received, the receipt number and the warehouse. A lot-tracked line also carries the lot number, with its own QR code, and the expiry date. The label gives the date only. It does not say whether a lot is expired. A line received into a box also names the box.
Quick Receive (a single SKU)
For a one-off, use Inventory > Receipts > Quick Receive: pick Client, Product, Warehouse, Location, and Quantity, add a Note if you want one, then Receive. Once the product and warehouse are chosen, CanShip pre-selects the bin that already holds the product, or for a lot tracked product, the bin that holds the lot you enter. CanShip confirms what went in and what the bin now holds. The window stays open with the fields cleared for the next one. Best for a single line or a quick correction.
A Quick Receive makes no receipt document. It is recorded in Reports > Audit Trail with the source Quick Receive, who did it and your note.
Receipt states and undoing
A receipt is Open (draft) until you confirm it, then Confirmed. The tabs filter Open / Confirmed / Cancelled / Voided / All.
Save Draft keeps an open receipt under its number without touching stock. You can come back to it from the Open tab, add lines and save again. On a saved receipt you can also group lines into a box or a skid (see Boxes and skids), and Continue on Mobile gives you a link to carry on from a phone (see Receiving on a phone).
Confirm Receipt opens a window that states how many lines and units will be added and lets you place lines on hold before they land (see Viewing your inventory and placing stock on hold). The hold option is offered once the receipt has been saved. Go Back leaves the receipt open. Confirm & Commit applies the stock.
Cancel Receipt ends an open receipt without receiving anything on it. It is kept under the Cancelled tab, and cancelling cannot be undone.
Confirming is reversible with Void Receipt. The window states how many lines and units will be taken back out of inventory, and a void cannot be undone. The receipt then reads Voided.
A receipt cannot be voided while the bin does not have enough free units to give back. Units allocated to an order or on hold are not free. CanShip refuses, changes nothing, and names the product, the bin, the lot if there is one, and the order or the hold in the way. Free the units, for example by cancelling the order or releasing the hold, then void again. A hold you placed while confirming the receipt is the exception: voiding the receipt releases it, and the window says so.
Tips
- Set the Client and Warehouse before adding items, since the location list depends on the warehouse and the product search is client-scoped.
- Type the full SKU and press Enter to choose it, or click it in the list. Check that each line landed in the Receipt Items list before you commit.
Was this article helpful?
That’s Great!
Thank you for your feedback
Sorry! We couldn't be helpful
Thank you for your feedback
Feedback sent
We appreciate your effort and will try to fix the article